Chocolate Bunny Cake (vegan)
This is an awesome belated Easter/Spring in general post! You can see everything I baked for Easter over on my Instagram page, but this cake was the big project. Let's (per usual) review all of it's pieces:
Rich chocolate cake layers
FANTASTICALLY DELICIOUS chocolate frosting
Ears made of frosting and daaaark chocolate
Oreo face
Adorable grassy green sprinkles from Sweetapolita
And it's 100% vegan!!

This cake recipe is adapted from one of Chelsey White's recipes. It's of course not vegan, but it's fabulous. So we'll just make some adjustments, and we're good to go. There's no butter in cake, so no need to worry about that. We need to swap the eggs for applesauce, and the buttermilk for vegan buttermilk. You can always buy buttermilk at the store, but it's much cheaper to just make it at home. One cup of buttermilk is one Tbs of lemon juice or vinegar plus one cup of milk mixed together. Let it sit for 5-10 minutes to thicken. Buttermilk gives cakes and baked goods a soft texture and light form. It works beautifully in this cake!

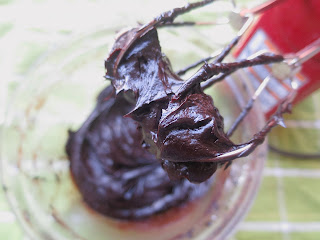
This frosting is fabulous!! The secret ingredient?? Avocado.

Avocado is delicious, but it does have a subtle taste. It's texture is it's main contribution toward the amazing turnout of this frosting. And for frosting, this stuff is healthy. It's only ingredients are avocado, cocoa, maple syrup, vanilla and coconut oil. You can find the original recipe here. I tripled it in order to be able to completely frost my four-layered cake. 😀


Decorating is the most fun part! You can use mini heart cake pans similar to these to add some feet to the front if you want, but I ended up not doing that. The ears are extremely important though! I created some brushstrokes (like in this snazzy cake:) using dark chocolate. FYI: chocolate must be at least 70% cocoa to be vegan, otherwise it probably has milk in it. Anyway, the last time I made brushstrokes, they looked pretty but were weak. This time I layered them. So I'd paint on one layer, freeze it solid, add another layer on top, freeze that, etc. The pink part of the ears - which is adorable - is made of vegan butter, vegan milk and powdered sugar, all dyed pink. Dying it is totally optional, but I thought it added a nice pop of color. 💖 You could add a tail to the back as well. A chocolate covered coconut macaroon would be awesome! Here's a fantastic macaroon recipe that I used for another vegan cake.

In the directions below, I'll talk you through frosting the cake. The only other cake I've really frosted was the Vegan Chocolate Coconut one linked above, but I'm a huge fan of watching cake videos. I bought this cheap but great turntable for this cake. So obviously, I'm no expert! But this went pretty smoothly.

Even if you don't decorate this cake to look like a bunny, I HIGHLY suggest you try it. It was a huge hit at Easter, and multiple people said it's the best chocolate cake they have ever had.😋 Happy baking!!


Rich chocolate cake layers
FANTASTICALLY DELICIOUS chocolate frosting
Ears made of frosting and daaaark chocolate
Oreo face
Adorable grassy green sprinkles from Sweetapolita
And it's 100% vegan!!

This cake recipe is adapted from one of Chelsey White's recipes. It's of course not vegan, but it's fabulous. So we'll just make some adjustments, and we're good to go. There's no butter in cake, so no need to worry about that. We need to swap the eggs for applesauce, and the buttermilk for vegan buttermilk. You can always buy buttermilk at the store, but it's much cheaper to just make it at home. One cup of buttermilk is one Tbs of lemon juice or vinegar plus one cup of milk mixed together. Let it sit for 5-10 minutes to thicken. Buttermilk gives cakes and baked goods a soft texture and light form. It works beautifully in this cake!

This frosting is fabulous!! The secret ingredient?? Avocado.

Avocado is delicious, but it does have a subtle taste. It's texture is it's main contribution toward the amazing turnout of this frosting. And for frosting, this stuff is healthy. It's only ingredients are avocado, cocoa, maple syrup, vanilla and coconut oil. You can find the original recipe here. I tripled it in order to be able to completely frost my four-layered cake. 😀


Decorating is the most fun part! You can use mini heart cake pans similar to these to add some feet to the front if you want, but I ended up not doing that. The ears are extremely important though! I created some brushstrokes (like in this snazzy cake:) using dark chocolate. FYI: chocolate must be at least 70% cocoa to be vegan, otherwise it probably has milk in it. Anyway, the last time I made brushstrokes, they looked pretty but were weak. This time I layered them. So I'd paint on one layer, freeze it solid, add another layer on top, freeze that, etc. The pink part of the ears - which is adorable - is made of vegan butter, vegan milk and powdered sugar, all dyed pink. Dying it is totally optional, but I thought it added a nice pop of color. 💖 You could add a tail to the back as well. A chocolate covered coconut macaroon would be awesome! Here's a fantastic macaroon recipe that I used for another vegan cake.

In the directions below, I'll talk you through frosting the cake. The only other cake I've really frosted was the Vegan Chocolate Coconut one linked above, but I'm a huge fan of watching cake videos. I bought this cheap but great turntable for this cake. So obviously, I'm no expert! But this went pretty smoothly.

Even if you don't decorate this cake to look like a bunny, I HIGHLY suggest you try it. It was a huge hit at Easter, and multiple people said it's the best chocolate cake they have ever had.😋 Happy baking!!

Vegan Chocolate Bunny Cake
Ingredients
For the cake:
- 2 cups of all purpose flour
- 2 cups granulated sugar
- 3/4 cup + 1 Tbs cocoa powder
- 2 tsp baking powder
- 1.5 tsp baking soda
- 1 tsp salt
- 1 cup plant-based milk
- 1 Tbs lemon juice or vinegar
- 2 tsp vanilla extract
- 1 cup hot coffee or espresso
- 1/2 cup oil
- 1/2 cup applesauce
- 1 tsp vinegar (I used apple cider vinegar)
For the frosting:
- 6 ripe avocados
- 1.5 cups cocoa powder
- 1.5 cups maple syrup (can sub for agave)
- 6 Tbs coconut oil (melted if you want silkier texture)
- 1.5 tsp vanilla extract
- 3 tsp cinnamon (optional!)
For decor:
- 200 grams vegan chocolate (at least 70% cocoa)
- Oreos
- 1 Tbs softened vegan butter
- 1 Tbs vegan milk
- About 3 Tbs powdered sugar
- Pink gel food dye (optional)
- Vegan green sprinkles (optional and linked above)
Directions
To make the cake:
- Preheat the oven to 350 degrees Fahrenheit. Mix 1 Tbs of lemon juice or vinegar into the vegan milk and let it thicken 5-10 minutes to make buttermilk.
- Toss together your flour, sugar, cocoa, salt, baking soda and baking powder in a large bowl until fully combined.
- Pour the coffee/espresso into the dry ingredients until it is fully incorporated - it will look like thick brownie batter. Next, pour in the buttermilk and mix completely. Repeat with your oil, then your applesauce (this is acting as our eggs), then vanilla, and lastly vinegar. It will be thin!
- Separate your batter evenly into 4 greased 8 inch cake pans. You can use different sized pans, your cake will just be thinner, wider, taller, shorter, etc. Bake them for 25-28 minutes, then let them cool for at least 5 minutes. They may be thin, as mine were. Because we're using a couple different ingredients from the original recipe, we're not going to get the same results as the original recipe. This is nothing to worry about!
- When your cakes have cooled, run an offset spatula around the rims of the pans, then set them in the freezer to cool more and solidify. I suggest moving them over to the fridge after a little bit, because we don't want them to get freezer burn! Leave them in the fridge until you are ready to use them.
To make the frosting:
- I would assume not many people have food processors large enough to make all this frosting at once. I divided my ingredients into three groups, also known as just making the original recipe three times.
- Cut your avocados in half and remove the pit, then scrape it out of the peel. Blend in the food processor until smooth. (I have pictures above.) Then add the rest of your ingredients and blend once again until it is smooth, dark, and chocolaty, and all ingredients are fully incorporated.
- I put my frosting in a large container and chilled it for a while so that it would be ready to frost the cake.
To make the ears:
- Melt your dark chocolate in a microwave safe bowl in thirty second intervals until it is completely smooth.
- Using a clean, food safe paint brush, pastry brush or spoon, paint two large strokes on to a piece of parchment paper or a baking sheet and freeze or chill.
- Let that layer solidify, simply checking on it occasionally to see when it is solid. Then brush another layer on, freeze, another layer, freeze etc. until you have used up your chocolate.
- To make the pink inside of the ear, mix together your powdered sugar, softened butter and milk. Once it is smooth, add food dye if you like. To soften my butter, I just microwaved it for no more than ten seconds.
- Spread the pink mixture on to the top of the completed chocolate ear, staying toward the bottom as pictured above, then freeze it once again. I actually "glued" the pink on with some frosting just to be safe - totally optional.
To assemble:
- I used a cake turntable linked above, but you definitely do not need a turntable to make this cake. I also used a cake board so that I could transport my cake from the turntable to the cake stand.
- Put a dab of frosting on to whatever surface you are decorating your cake on, then press on the first layer. Using a spatula or icing bag fitted with a round tip, spread some frosting on top of your first layer, and smooth it out evenly. Then gently place on your next layer. Repeat this with the rest of your layers. I like to put my last layer upside down to create a flat top surface - something I learned from Chelsey White. Then you're going to spread some frosting on the top and sides of the cake, smoothing it out and filling in any gaps with more frosting. This is called the crumb coat - a layer of frosting that traps the crumbs before the final layer in put on. This is the going to be chilled in the fridge for at least 3 hours. Over night would be best!
- Remove the cake from the fridge and apply your final layer of frosting. You want to smooth this out really well using an offset spatula - always recommended for frosting cakes - or a bench/cake scraper. Once you are satisfied chill it once again for at least 2 hours. It's time to move on to applying the face!
- To create the face, use the cream from multiple Oreos and roll it up into small balls for the eyes. Make another ball for the nose, and longer rolled up pieces for the mouth (all pictured above). For the middle of the eye, use small broken off pieces of Oreo cookie.
- Remove the ears from the freezer. I trimmed mine very carefully with a knife to create pointed ends, but leaving them round would be fine as well. I propped them up on top of the cake with two vegan marshmallows. You could stick in toothpicks or wooden dowels instead, though I recommend you give them support since they are quite heavy.
- Lastly, I spread some icing around the bottom rim of the cake. I poured on my vegan sprinkles linked above, which gave off a grassy look. Perfection!
- Be proud and enjoy!!🐇🍫

Look at those layers!↑


Comments
Post a Comment